Wednesday, March 24, 2010

Quick Detour... ack!

We have a newsletter we have recently reestablished at the Adventurers Guild again. In our letter "this week at the guild" we have begun a "tale of four gamers" series of articles. We have had a great response to our call and a bunch of the guys are committing to doing pre-heresy armies. I had promised to do the Thousand Sons when I got other guys to begin making pre-heresy stuff as well.

So I broke my rhythm with the zeppelins and decided I needed to get the originals sculpted, so I could begin the process of casting resin doors and shoulderpads for my legion. A long time ago I had purchased a ton of 1000 Sons heads back when GW had bitz service. Now this is a WIP photo service, since my camera ran out of batteries before I got the last pictures taken. I also did a few chest pieces for my Marines as well. two chests with inset gems and two chests with scarabs set into the plate. All and all I got two shoulder pads completed, a land raider door, a rhino door and the four chest pieces. They will be set into the rotation for me to resin cast them in parts so I can add them to my box of space marines with the 1000 sons heads and some tabards from the Dark Angels and Black Templars upgrade sprues. I am really pleased with how the finished pieces look, but I cant post them for another day or two till the rubber sets and I can do my first test pours. now back to the Zeppelins. I have gotten 2 of my wing weapon pylons completed and I am hoping to finish them off tomorrow night. (4 to go). I also managed to get the last of the 12 havoc missile launchers I needed for the multiple launch rocket pods. I will begin working on my zeppelin air bags this weekend while I am at Regulator Con. *** here is a pict of the completed doors. I got them out of the mold and got a picture for you guys. - Bossman

Monday, March 22, 2010

Thoughts and ruminations

I have not gotten much done this past week as I was really busy in the store handling customer issues and getting our D&D World premier day coupled with a 30,000 point Apocalypse style game. A customer for a very long time was also back for his week of spring break from West Point to spend time with his family and to get in a few games at the store.

The reason I am writing all of this? What does this have to do with my bitz box? Well, since you asked. I am writing about my apocalypse game that we played on Saturday. We had an odd number and I had to participate to keep things even. I chose to bring my Mentor Legion drop army coupled with a Baneblade tank I have in our display case. I don't particularly care to play Apocalypse games right now. Don't get me wrong I think the games are fun to play, and the game got in 6 turns in 6 1/2 hours (which is a good pace for 10 players). But rather I was just filling in a spot and ended up lending a hand where I could, but I really didn't feel invested in the game. I also got frustrated with a Eldar Scorpion Super Heavy Tank with it's crappy 'D' strength weapon which seemed to pick on me throughout the entire game. It had bothered me so much that I threatened to ban D strength weapons from the next game (by downgrading them to a Str 10, AP 1.) Needless to say I enjoyed the company of my fellow gamers, but for the most part I didn't enjoy the game.
When asked about my lack of apocalypse enjoyment I had ultimately concluded that I didn't enjoy myself because I did not have, what I would consider, an army made for an apocalypse game. All of my armies that I build are made for tournaments. Tournaments are not apocalypse. Let me say that again, Tournaments are not apocalypse and therefor need a different mindset to be able to enjoy them. I used to have a lot of Imperial tanks and could participate more actively the larger games, but I am seriously behind on the curve at this point. I had also gotten frustrated at the guy with the Eldar Super Heavy Tank. I had felt that I was particularly his chew toy with that damnable D strength Pit Bull. But upon closer observation I had mostly gotten frustrated with the fact that I did not have something to threaten his tank, and therefor felt it could run ram-shod over my guys. My Baneblade did not have the opportunity to do anything of consequence in the game and was dead by turn three. My anger at his tank surviving the game until the last round of hand to hand combat really could stem back to the playbox. He had a cool toy and I wanted one too. (really stupid when you put it in those terms, but accurate).
Fact of the matter is, the guy with the Eldar SH tank paid a lot of money to buy that tank, It was painted by me as a wedding present and he has as much right to enjoy his toy and play with it in the only style of game where it is allowed. I was being a sourpuss and threatened to ruin his fun as well. Now for the record, I will not be banning 'D' strength weapons in our club's future apocalypse games, as I had threatened to do so when I had a hot head. Instead I will be set on my own plans to begin adding to my armies so that I too can have cool toys that will be the envy of every adult kid at our Apoc games. I need to make a mess of stuff, and with an already busy schedule, it will be daunting. But I really want to get my hydra flak guns up and built (fortunately I have Ork trukk chassis on the way!). I will be building a super Zepplin with will be used as either a Reaver Titan, or a Leviathan Command HQ, Or perhaps a Capital Imperialis?
So this weekend I did enjoy the Apoc game more than I had thought at first notion. Yes, I didn't bring the right stuff to feel competitive on a field where you remove guys 30 at a time. But, I resolved to begin adding units to my Vostroyan IG and my Mentor Legion Space Marines so that they will not only be competitive in small games, but can give as good as they get in the lager fields of battle. And although my guys got slaughtered but good, they did manage to hold one objective and they did manage to kill a lot of Tau stuff.
Hey Apoc games can be fun and they can be played in a reasonable amount of time if your club can keep a strict use of the time. It gives everyone a chance to play with forces that they normally couldn't in formations that would not fit on a normal sized board. They also let us play with much bigger toys, and that is really the heart of it, isn't it? So i resolved to add more forces, and to remember everyone comes to have a good time and overall that is what we all got.
The next time we have an apocalypse game I hope to have a better force and a better attitude about these monster games.

Monday, March 15, 2010

WIP Zeppelin Part 2.

Welcome to part two of my foray into the world of IG airships. Today I will be showing WIP of the control deck and cabin. I wanted my WWI airships to have a feel about them of being pulled from a pulp adventure a little more than from real life. To this end I am making a cabin large enough to have two souls within. The Airship Captain and his First Gunner.
The airships hull is going to be from the super cool Valkyrie model from Games Workshop (ltd). The Cabin is built from sheet stock and will wide enough to handle two, non-based figures. The armorplas windows will be extended out at about a 25-30* angle towards the roof to allow for greater visibility. the rails for the windows will be added in a future post. (once I have figured out what i want to do with it!). I then placed heavy I beams within to help reinforce the hull of the airship. The exterior will receive a riveted look, much like my tanks. where the Valkyrie is a sleeker vessel with inset rivets, I will be building over that and extending the rivet heads to the surface (much like on my tanks) Though it will not be as clean visually as aircraft armor, it will set very well in the army I have been working on.
The interior was set with a GW wagon wheel and various other "gubbins" that I had in my bits box to help make the interior look suitably archaic with wheels and levers instead of clean panels (those are only on the como gear at the back of the cabin.) I will be adding magnets on the interior walls and under the nose hatch so I can switch out armaments depending on which Valkyrie I bring to the fight. Pictured to the left is my las cannon nose mounting. I am also building Multi-laser and twin-las mountings as well. Most of this stuff isn't to bad once you have it figured out, but when you make 3 of everything, it does become a bit tedious at times.
The multiple-launch- rocket pods from the Valk kit are being set aside for something a little cooler and a little older.
The mounting system for the sides of the cabin area are being made of a girder style material available from Plastruct. I then added connectors and magnets for the girders so I could easily remove them if I needed to for the las cannon mountings (Which I am not sure how I want to make them just yet)
The last picture here is the MLRP that I will be using for my Zeppelins. It is simply constructed from 2 Havoc Missile Launchers from the CSM vehicle upgrade sprue.
This system is perfect for me since I am making 3 of these guys. After I finally get this project done, I doubt I will be returning to make more in the near future.
The Bigger Missiles that come with the Valkyrie kit will be used (after they have been magnetized) and that will allow for all weapon systems other than the twin Las cannons that are part of the Vendetta weapon systems. I could mount them on the wings kinda like the MLRPs but they are not a "deadfire" system like I consider the MLRP to be. I am hoping to make a crew mounted fitting on the outside of the cabin to accommodate additional crewmen for the targeting and firing of these weapons. (get the idea that I want there to be some expectation of "reasonability" in my designs. and I already know that you think zeppelins can not go fast and therefor its impossible to use them in place of Valkyries. to you sir I say "Bully!" A fast vehicle can also go 6" and still fire everything. (the smooth ride of an airship is perfect for the stabilization of the weapon systems) the armor value is reasonable and since I don't use hydrogen for the airbags or thermite for my paint, I should be fine there too. But I am planning on adding JTO rockets to the side on the rare turn I may have to go faster than 12" in my Valkyrie. I don't plan on it much, but for my erstwhile opponents, I would hate to have them felt cheated somehow...

Saturday, March 13, 2010

Memories of the Slann

This next piece is my side project I had begun some time ago. I was going to redo my Tau army. I had created an Invader Zim style army, where the tau had green skin, little antennae, and red eyes. The were fantastic. I took them to the Baltimore GT back in 2002(?) I think. On with the show...
I had decided to redeux the army based on a Slann theme. A Slann was going my Ethereal, Skinks were to be my fire warriors, and Lizardmen were to be the Kroot for my army. The skin was a beautiful hawk turquoise of the guys and I went through and converted 60 fire warriors and painted this lovely hammerhead for the force.
I wanted to go with a bit of a cross with a hybrid of Eldar and Tau technology. The Slann was a perfect match for the Tau (IMO) with super-cool technology but can't really fight their way out of a paper bag without the help of big brutes (Lizardmen warriors / Kroot).
Since the Eldar were the children of the Slann (at least for this story) I wanted aspects of their look brought into the this army. Hence the use of the Falcon "wings" to help make a "Bird of Prey" look to the overall model.
I also wanted to change up the look a bit. Since they are so technologically advanced I placed the scanner bit on the top for greater use of visability and under-slung and center-mounted the Rail Gun, which helped make the model a little sleeker. I went with a brighter look to the paint scheme than I normally use. I tend towards darker schemes than this. But the use of bright colors lent it self well to the overall look of the piece as well.
I re-worked the side mounted burst cannon to make them seat mounted gunnery positions. I personally would not want to be one of these poor bastards. You must have really crapped in someone's spawning pool to get this job! The job would probably be desired but I think it looks dead cool. It is a little hard to see, but each of the gunners have their own targeting screen, drink cart, and seat warmers. (its a bit hard to model the drink cart and seat warmers.)
I had put the model together back in (or about) 2005-6 and placed it on this diorama base so I could take it to the Chicago Golden Demon Competition. I managed to get through the first cut, but that's where it ended. (Sadly, this is the closest I have ever gotten to placing in the competition).
All in all I was very happy with the piece, the execution, and the paint job. I liked the base as well. I kept it mono-chromatic to help the tank pop but still add to the presentation. I wanted it to be screaming across the marsh flats with the door gunners shooting stuff and wishing they were inside the tank instead. Since then, I have not continued the army. I still have the skink fire warriors in a box somewhere... But I got caught up with my Vostroyans and that's been it ever since. (not really, I will show you guys my Mentor Legion of Space Marine fame some time in the future).

New W.I.P. Project Zeppelin


Zeppelin you ask? Well, let me explain. I have been working on my Vostroyan IG Army, off and on, for the last two years. I get caught up in the muse and I go for a while. I get a mass of creativity down, then with the weight of the store on me, slow down and move on to another project that I need
to do for a customer or the store.

I had always wanted to make Valkyries for my army, but since I was going with a Russian theme, I had planned on making a Hind D Helicopter. I had been a little slow on the uptake and did not get around to it fast enough. But a guy I have known for a long time did. Rob Baer of Spikey Bits not only beat me to the punch, he did a fantastic job of it for his Orky "Imperial Guard" Army, which he took first place at Mechanicon '09 and Cabin Fever '10. You can find a fantastic photo of it here: Deathskulls Chopper.
He did a great job with the piece, and I certainly could not fault him for something I didn't tell him about and he did independently of everything bossman. So I decided I wanted to take a different tack to my problem.
I began to reassess my army and what I had wanted to do with it. Like I have gone over in previous posts, I have based my army on a WW I theme. The older style of tanks, equipment and so on. Which is what led me to the zeppelins...
Zeppelins were the terror of the air. They were perfect for me. My "zeps" would carry squads of men, carry deadly ordinance and hopefully look great on the battlefield at the same time. Now for some of the logistical problems.
* I need it to be about the same footprint as a Valkyrie.
* I need it to look like it could carry 12 men and their equipment
* I need it to carry the varying weapon payloads that either Valkyrie can carry.
* I need it to look like it belongs with the rest of my army.

Not a tall order at all. So I took to the problems one by one. The foot print of a valkyrie model is 13" long and almost as wide, but it remains on a flying stand while its mobile. The airbag I sketched out is going to be 13" long. I decided to use the payload section of a Valkyrie model so that there would be no thoughts of what it could or would carry. The picts on the left side are foam core mock-ups of my sizing. the air bag would probably be made of that material and then skinned with a material that I could make rigid later.
I also wanted a classic ship like bridge for my crew to stand on. The captain of his airship majestically looking out over the armored plated glass of his cabin.
I was relatively happy with the basic mock-up of the pieces and now had a rough idea of where I will be going with the piece. I would spend the next few days digging through my bitz bins to find everything I could to entice this model into being. Oh and by the way, I will not be making one Zeppelin, but rather three at the same time.

And just to protect my ideas of other things I am planning on making for my army :P I will be making Manticores for the army that look like armored trucks with rockets on rails (Stalin's Organ). The Hydra Flak Batteries will be made to look like armored trucks with a flatbed AA Gun system with a trailer to pull a huge spotlight for spotting enemy aircraft and ... lol. Can't give away all of my ideas yet!

There will be a lot more on this stuff coming to a computer near you!

Monday, March 8, 2010

More on my Vostroyan conversions... the Hellhound

Here is the next installment from out of the vaults from my mighty Vostroyan Archive. This is my Hellhound / Chimera chassis. I wanted to take the look from the FT-17 light tanks of World War 1.

These two man tanks were some of the first light tanks. These are perfect for my chimera chassis. Why go with something so small? Where is the transport capacity?
There is something on the transport capacity of my Chimeras in a future post.

As for the Hellhound this was perfect for me. A small mobile tank that would have its fuel tanks carried on a wagon behind it. The fuel wagon is made from a newer version of the IG dozer blade assembly. An axle with two Orky Big Gun wheels. (This is probably one of the biggest points of contention with Games Workshop dropping their Bitz service. I can no longer get these items. So I will have to come up with other means...

The hull is a Leman Russ tank hull with plastic card stock sides. The turret requires two chimera turrets. The hull mounted weapons (in this case, the Heavy Bolter) are magnetic so I can change them out at my leisure and the vehicle mounted Heavy Bolters are all water-cooled Browning style heavy machine guns. The exhaust on the back has been fitted with a wire mesh heat sink to help protect the tank riders from serious burns (as long as they stay behind the flame thrower!)

The Fuel tanks are also magnetically attached to the Hellhound's hull to allow for ease of storage and game play. The fuel tanks are cosmetic only and are not a targetable section of the vehicle. And as a point of note! This vehicle has the same size footprint as a standard Chimera / Hellhound.

The Hellhound's Inferno gun is constructed from brass tubing, aluminum mesh, aluminum tubing, and the pewter Heavy Flamer tips from the old Killer Kans (GW) kits. The mounting as fitted as a canvas cover made of green stuff.

The suspension was created out of more Big Gun wheels, IG tracks and wheels. The upper assembly of small tank wheels also has magnets secured under it so I could have added track guards to my vehicles (an old vehicle upgrade option). These were never made. All told so far I have constructed 2 Hellhounds and 4 Chimeras (without all of the weapon options currently available). Though I do plan on making them in the future. I will be custom making a new chimera turret so I can make all of the weapon options as swap outs in the far future. I hope you liked this next installment!

Befuddled and Disgruntled

Well I tried to take a further step into the aether know as the blogosphere. to quote Charlie Brown "Aaaaargh!" I wanted to include a slide show of picts of my painted Vostroyan Army. I went to add the gadget and opened an account in photobucket... and I can not grasp the concept of getting it so sync up with my blog, find my pictures once I loaded them on a general search, or just be able to have not wasted my last 70 minutes...

(Sigh) (Angry screaming) (Shaking a fist angrily at an uncaring sky)

[ADDENDUM *** thank you to Rob Baer "spikey bits conversions" I got it straightened out ***]

Friday, March 5, 2010

Dragonheart

For my next installment I want to show a piece I did for my patron, Tammy Little. Tammy is a very nice woman who for a time absolutely adores dragons.

This was the first project she ever contracted with me. It was a vinyl kit that she purchased from the internet. It turned out that the kit was a copy of a vinyl kit. (sadly a knock off) . I was contracted to assemble and paint this kit for her.

Being a copy of a production kit. It fit very poorly. VERY POORLY. I ended up using a lot of epoxy putty to fill in the gaps. heat treating the vinyl only worked a bit, so the rest had to be filled in and sculpted.

The rebuilding process took about two weeks of working on it at the store as time allowed. The entire process was rather frustrating as it was poorly copied to begin with and the original they used was probably a little distorted to begin with. anyway...

After the process of putting the model together. the painting went well. This was done at a time when I did not have access to an air brush, so this was done by manual brushes, washes and powders. I enjoyed painting the model and working on several new techniques for myself.

Thursday, March 4, 2010

Fortress of the Eagles

This is the fortress of the Eagles. It was built for a Apocalypse game we had at our store, the Adventurer's Guild. The fortress was over 6 foot long with roughly 20 Imperial Bastions, 2 Shrines of the Aquila, 1 Landing platform, and additional parts from the Plastruct line of plastic products.

It took me and my assistant (Brad) over 4 weeks to get the design down. we worked with the apocalypse coordinator (Chuck Cordivano) to determine what we were going to set on the table.

The walls provided a 4+ I save for any defenders on the walls, thanks to two shield generators (pictured below). The launch pad was converted into the main gate, which could swing open. The parapet over the gate was a separate piece that was connected to each gate house through a series of rare-earth-magnets. This allowed for the fortress to store away easily into five sections (none longer than 24")

Battlecannons were mounted on magnetic mountings in the central windows. this gave a little extra punch to the front of the fortress.

The apocalypse game was set with the Imperium under siege. Chaos was knocking at the proverbial gates and the Orks came along for the ride. There were to be several titans stomping across the field and we were wanting the fortress to be capable of, well keeping them at bay for at least a little while.

The new Shrine of the Aquila kits from GW gave a wonderfully imperial look to the edifice of the fortifications. the ground level parapets were something for only the strongest of resolve. I would hate to have been the poor schmuck on that section of wall.

The guys had a great time at the game, There was several titans, a stompa, a half a dozen super heavy tanks, and a few aircraft.

All told it was a fun project and I hope you like it too or perhaps inspires you to make something cool as well. We will be planning a "Storm the Trenches" World War One mega game in a few months and I am beginning the planning for this soon. (ok, I just want a cool table for my Vostroyan Army to march around on.)

Wednesday, March 3, 2010

A bit of the past, part deux (the beast)

With my Vostroyan army being built in full swing. I set upon my greatest task to date. My demolisher tank, affectionately known as "the beast". In the process of me developing my army I like to make lots of sketches and to work through the process of my desires vs. reasonable practical application. my desire was to create a tank that was reminiscent of a MKI Tank from WWI, but with a turret on the top. The entire tank was going to be designed with actually having crewmen figures within the vehicle. I wanted to make a tank that was big enough to actually accommodate a "reasonable" amount of space for crew, ammunition, and control mechanisms. Needless to say, IMHO, my demolisher tank was going to be about 50% bigger than a normal Leman Russ Tank. I was comfortable with this design "flaw" as the basic designs in armor philosophy were a bit more basic and not refined to the "sleek" tank most guard players are familiar with. As I began to build out the specifications for my new toy, I decided that I was going to model kneeling Vostroyan gunners in the sponsons, this required the sponsons to be roughly 1 1/4" in height to handle this.
I wanted to create a fully detailed interior, so that meant I was in for a 
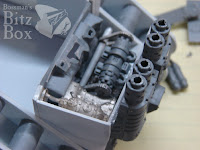
lot more work! I began working on the engine compartment. The back fitting for the engine was a land raider mounting, the smoke stacks would later be enhanced with the screaming eagle stove pipe toppers from the old metal Imperial Steam Tank. Bits of the engine were from the Dwarf flame cannon, IG sentinel, and snotling pump wagon (all older versions of what is currently available).
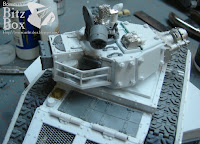
With the engine compartment completed I began working on the interior of the vehicle. This is the primary area the tank crew would be working and living during the protracted engagements. This area had to accommodate 5 crewmen, food, fuel, ammunition for heavy bolters and the dreaded demolisher gun. with the height of the interior I felt that the crew would not be able to heft a solid casement round up to the breach (a height over the standing head of a man). So I decided that their rounds and the bags of propellant would be stored separately and thus easier to heft and load into the gun. The wheel house is the elevated compartment on the front right side. a small ladder was built for ease of up and down. The hull gunners seat is on the front left and space was left in the center of the compartment for the turret ring, gunner station and tank commander seat. A small hatch was added to the floor in the rear near the fuel tank (back left). When I was asked about the "escape hatch", I grinned and said it could be used as that, but it's mostly for washing out the tank when a nasty round spalled out in the interior and the crew had been killed. (like I said earlier, I was building this on a realistic "Russian mentality" life is cheap, equipment costs money, so use it till it falls apart)
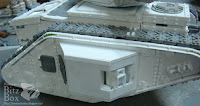
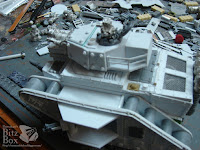
The sides of the vehicle were made to look just like a normal Leman Russ tank. I layers several layers of plastic card on the side to build up the features of the original tank, but in a slightly larger scale. Next, two hole punches were used to make 1/4" and 1/8' holes in a thin piece of plastic card. These circular chips were then placed on top of each other to build up the retention plates for the suspension. Rivets of 1/32" plastic rod were cut to give the retention plates the final touch and to help give definition to the riveted plates of the hull. The track tensioners were made from 27 individual parts. (I am glad I only needed to make 4 of them). The Las Cannon was added to its mounting on the front of the hull and I began adding the heavy bolts that would help hold the front of the tank together. (made from hex rod and circular rod). The wheel house received it's name plate and imperial flying skull icon. But the area of greatest debate was the shot traps to the right and left of the Las Cannon mounting. I debated the demerits of these areas and talked with fello
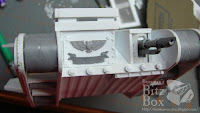
w tread heads about filling those areas with sandbags for additional protection for the crew within. But I decided against this additional protection thinking that the "dress, right, dress" of the army would not allow them to make such uncouth modifications. So the trap door was placed within to help wash out the inevitable gory death of the crew, but the mechanicum decided that the traps would deflect enough of the incoming shots energy 
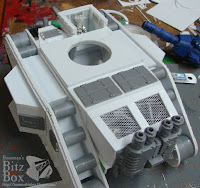
that the equipment should be protected, so that would be good enough. the top hatch was built next with enough access panels for ease of loading and unloading equipment and men. A nice mesh cover was placed over the engine deck and hinged for easy access of repair. Screen panels were added to the interior of the vision slits for the driver, so that he would have better protection from the grenades of assaulting forces. The sponson pieces began taking shape. You should also note that I used two sets of road wheels to accommodate the land raider track links I would be using later on. The land raider tracks were from two land raider kits (it was a lot of tread to cover!). The one change I made to t
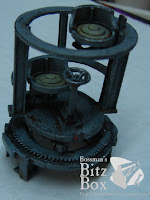
he land raider tracks was to remove the imperial eagle from each of the 12th segments. It was replaced with a reworked skull motif to exemplify the sacrifice men made to see it through to the end. the sponsons were set with magnetic inserts to handle heavy bolters or plasma guns (I have since become a fan of multi-melta sponsons now as well!) I next began working on the turret, which is the silliest part of the LR tank kit. There is no way to feasibly handle anyone being in the turret while the gun was going to be fired. (the tank commander's legs would be smashed by the violent recoil of the main gun) I decided to build a gun mounting that was more reasonable and off set the tank commanders hatch so he could maintain a commanding view of the battlefield while saving his pelvis in the process. To highlight the additional side armor of the Demolisher tank, I incorporated heavy bolt-on plates of armor to the turret. Once again, with practical Russian theory, the turret would be the next most hit location. If a penetrating shot entered the turret, the mechanics could replace the armor with a replacement plate and a few bolts to cap it off. Stowage areas were added to the back of the turret to provide additional carrying capacity for spare rations and the crews personal gear. the top hatch was hinged for removal of the commander (if I wanted to button up) and a few final touches were put on the exterior such as sighting instruments, fuel cap, and storage hooks. As a quick point, I modeled the breach in the turret to make sure everything was kept to my scale. A sighting perascope and communications gear were also placed in the turret. I love this vehicle. the beast has survived many, many more battles than it ever should have, though its big tracks have apparently make it easier to immobilize. This full model was one of a kind, but I do hope to make a newer version of this in the near future so I can resin cast the parts. I really want to see a tank squadron of these babies pushing out across no man's land. Besides if I can make a cool resin version of this tank, maybe I can sell a few... :)