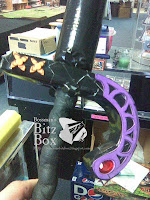
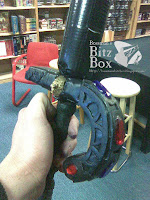
 Over the summer I would set aside my Xacto knife and bitz and get out into the fresh air and go hiking, camping and hit people with swords. I participate in Live Action Role Playing. The LARP I currently play is called Alliance. The chapter closest to me is the headquarters chapter in northern Pennsylvania. I am a staff member there and I am the head of their props department. I am responsible for making a lot of things. (see older posts for an idea).
Due to my ability to work with modeling supplies, and being an artist, allows me to occasionally pick up a little side project or two. The sword you are watching be built is one of those projects. The sword was requested to show a kind of Arabian style to it. The customer wished for it to be gem encrusted and to show the power of the lions of the desert. I began with a basic fiberglass core and created a "standard" closed-cell foam blade to look vaguely like a scimitar. But where the true test would be foind in this project was my ability to create a cross guard that contained the aspects of my patron.
The orange and purple material on the cross guard is called craft foam or fun foam. It comes in sheets and was cut with scissors and xacto knife to create flower motifs on the "back" of the cross guard and a stylized gem settings for the "front". The fun foam is then super glu
 ed to the corss guard so it sill stay in place for a very long time. The gems are found in any craft store as well. But what was to really set off the sword with the lions of the desert motif. I wanted lion heads on this, but where was I to get my inspiration? Well, in gaming figurines, of course! I found lion heads that I could modify and make into a lions head bas relief. I sculpted the rest of the lions head out with a non-drying clay and set to making a mold so I could resin cast them. The resin cast would allow for a stable material and I could inset heavy wire into the the resin mold to give it additional strength. (see? this is still relevant to modeling! =P)
 After the mold was ready I line the inside of the mold with a gold powder and cast the lion in a dark grey resin allowing the powder to be inset into the piece and give me golden lions that could be semi-permanent and could accept a scratch or two without looking like crap. The tabs on the sides of the bas relief was to give an extra area to secure the lions head to the cross guard by wrapping tape over the tabs to pin it to the cross guard as well.
After I inset my two good casts needed for my lions, they were secured with superglue and gorilla tape. I then coat all but the lions heads
 and the inset gems with plasti-dip (tool dip) to coat the surface of the sword and to help waterproof it. This also added another layer of adhesive to the piece and acts as a primer base also!
This then allowed me to begin painting the cross guard and also making it look like gold. This was a simple process of using acrylic paint on the surface in a bronze, dark gold, then bright gold
The finished product is what you see here. This piece took a few days to make and I just jumped into the next project and so on and so one. I made suits of
 armor and more weapons than I care to count. Why no posts about this stuff at this point? basically. I just wanted to keep the blog to be about modeling figures, so I didn't post anything much at all until I could get back to my zeppelins and other goodies I am looking to make for my Vostroyan Imperial Guard. Well, thanks for reading and I am posting another status right after this to slake your thirst for my progress reports towards the Mechanicon '10
- Bossman


No comments:
Post a Comment