Saturday, March 15, 2014

Trucks!


I wanted to show some of the work I have done for some of my other Vostroyan Vth vehicles.

I really liked what Dave Taylor did when he redesigned the Imperial Guard Chimera vehicle (See it Here!) the look of the truck is a great way of showing another version of a chimera with a front armor of 12 but the rest AV 10. His work on his trucks are exactly what I would expect for the Cadians, or any other imperial army with more standardized equipment.

However I was looking for something that would fit in better with my WWI theme of my Vostroyan forces. This is more of what I had in mind. The Russian Zis 6 Truck.

This truck was used for all sorts of roles in battle, most of which were a support role, nothing directly in the teeth of combat. This is perfect for Manticores, Deathstrikes and Hydras. (oh my!) I decided to begin the same way Dave T. did as well. The Ork Trukk chassis. Normally found for a ~$4.00 or so on EBAY.

The wheels were resin cast from a modern day 1/48 scale US Marine L.A.V. Shortly I removed the fuel tank as it would get in the way of my cab.
The armored fenders were the armored skirts from a Leman Russ / Chimera vehicle kits (current edition)

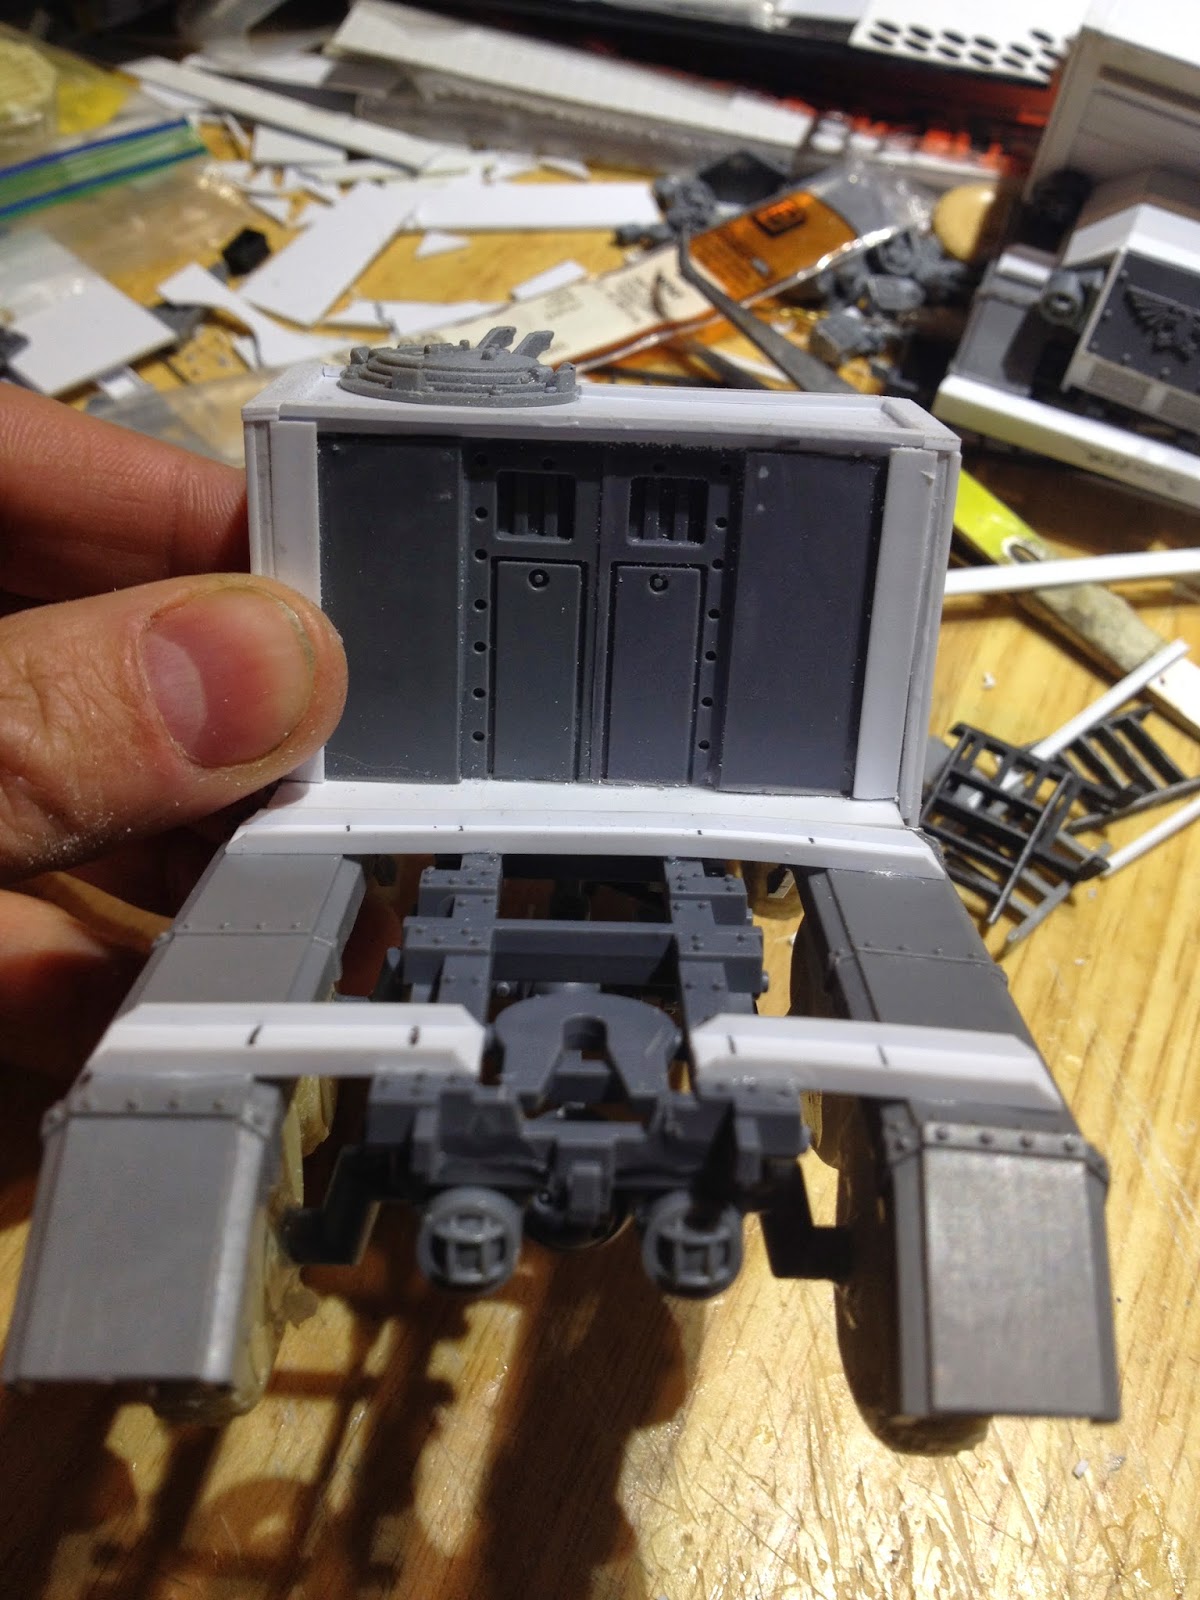
From there I began to build the cab. The front of the engine cowling was taken from part of the front fender of an Imperial Baneblade kit (Available as part of the accessory sprue available on GWs site. (I used almost everything from the sprue, I think it was probably worth the cost of it.) (almost)  The rest was constructed out of plastic-card. A small piece of wire mesh was placed on the front for a little air flow. (I figure armored louvers are behind the mesh to help protect the engine.
 

The headlights were from the accessory sprue for the Imperial bastion (they normally have a skull shaped vox caster/scanner thing on the top of them.
I framed out the cab in plastic card for the basic form. part of the baneblade accessory sprue made up the hear hatches of the truck cab. 

I began adding detail for the heavy bolter. This was made from the heavy bolter kit for the Imperial bastion. (how did I have so many of these things? take a look at my imperial Fortress of Eagles I had not used all of the heavy bolter kits that came with the bastions. This gave me a great opportunity to have a "bastion like" firing port to help protect my trucks should the enemy get past the front echelons. 


I put an old school IG vehicle hatch on top of the heavy bolter implying there is almost full cylinder set into the truck cab, as the Vostroyan Vth doe not waste good materials. Rivets and a drivers port was added to the cab, as well as a basic bumper.

I then set about building up the doors for detail, most of which is punched out of a sheet of plastic with different sized hand punches you can find in any scrap booking section of a decent craft store.

Fuel tanks and a bit of plastic card to add stowage as well as steps up to the cab. 
I placed magnets under the strips of plastic on the rear fenders. These magnets will hold down the truck beds that I will be building. I used two more "bastion" lights for the rear lights of the truck.

I built six trucks overall with the intent of allowing several bed designs to fill out my rear echelon battlefield roles. This allowed me to create 2 basic truck beds; 4 Hydra AA guns; 2 Deathstrike Missile Launchers and 3 Manticore Rocket Batteries.

Here are a few shots of them fully painted.   Decals have been subdued since. pictures were taken.       - Thanks for reading!


Saturday, March 8, 2014

More on my Hellhound variants


Among all of the craziness that was shown in my last post about Chimeras, I wanted to now share a bit of the variants to represent my Bane Wolf and Devil Dogs. (I had put up a post of the Hellhounds quite some time ago.)


Here is the current GW version The nozzle is a little odd, but since workshop decided that was the design, I would take it as a nice suggestion and we could go on from there. 

Now if you are not familiar with the Bane wold for the Imperial Guard (at least until the codex is renamed), it is to be well respected. This little honey can melt anyone with its caustic chemical sprayer. Seriously 2+ poisoned template attack. (at least until the new codex is out in April '14)

SO from that template I went forth to create something that would fit in with the theme of my army...


The first consideration was in creating something that resembled the GW design but with my own flair.

The nozzle was fashioned out of the Imperial comms relay you get in the Imperial bastion. its two different parts to create the barrel. If you look at the GW sprues you can figure it out.

I added a heavy fluid pump (right side of the barrel towards the back) This was made from an extra hydrolic piston from the newer IG dozer blade. I added a small vent on the front of it. This vent was shaved off of a Space Marine searchlight. 

All told I was very happy with the look and like it more that the design GW produced, but that is aesthetics. What GW designers like and what I like may diverge from time to time, but rest assured I will use the designs I like. =) 

I produced two of these turrets so I could have the option of fielding both in a battle line. And the Emperor's mercy will be delivered to the enemy. 

I created two chemical storage racks for the Bane wolves as well. These, like my Hell hound carriages, are magnetized and can be removed if I want to use the chassis for another type of vehicle. 

The design is created from extra fuel storage tanks off of a Baneblade accessory sprue with an extra fuel tank added to the stack. Another part of the newer IG dozer blade and a few boxes helped flush out the look of the piece. Who knows. I may have to make more! 

The Devil Dog was the next turret I fashioned. I only made one of these as I am not a big fan of them at this time, but they have their uses. The basic design was the creation of a Heavy Multi-melta.


The barrels were created from the exhausts of a new Leman Russ Demolisher kit. The extra vents and cowling help illustrate the additional heat generated from a multi-melta that generates a blast template.

The barrel tips were two of the old GW pewter multi-meltas that came in the old demolisher kits when they used to have packs of metal pieces included with a basic Leman Russ kit. 

I used two of the multi-melta barrels in an over-under fashion. Additional coolant tubing was added from an old cabling kit that GW used to sell as bits. 

Dave taylor has a great article on making tubing out of green stuff on his blog (check it out here!) GUitar string can work really well also. 

I only made one of these. Depending on the IG (AM) codex could change this or rules in the new (Not 7th edition) of the WH40K rules could change how vehicles work and damage is done. I could make more of them. The casement on the back is also magnetized. Extra storage for the melta cells. 

The sides of my Hell Hound / Bane Wolf / Devil dogs have heavier armor on the sides than your average Chimera hull. So, to show this I decided to create extra armor sides. 

The additional armored skirts were attached permanently to 4 hulls of the 13 Chimeras I made. I figure when I go to battle, the most I will ever truly need on the table top is four. 

Should I need more, I hope I have the fortitude to make the additional pieces, but I have bigger problems at that point.

All told I am very happy with the look of the variants and of the Chimera "light tanks" as a whole. 

I will bring another article soon on my trucks!                                                      - Rich


Sunday, March 2, 2014

Vostroyan Chimera's part deux!

Hello all,

      I have been working on several projects over the last few months and I wanted to share with you what I had been working on. A while ago I had a few articles concerning my chimera variations from the normal GW model. If you would like to see that article, you may go here or you are welcome to scroll back and check out the article that way.

      SO I got on this build it or sell it kick recently and decided to build everything that I can out of my Bitz Boxes and found out I could be rather productive.

 I was able to manage another 10 hulls. 

I planned on creating a total of 8 chimera hulls (including the two that are already painted)

I also made a total of 5 "heavier" chimera chassis that would be used for my Hellhound / Bane Wolf / and Devil Dog bodies. 

You will notice that the turrets have a yellowish color as they were created and cast out                                                                                                 
I will be showing them off in a future blog post. I will be trying to make more posts with a far greater frequency as well. 

Here is a close up of the stowage on the back of the vehicle. I really feel the details make the models. 

All in all it took about 2 weeks for me to sort through the bins and see what could be made and what types of chassis I wanted to create. 

Shortly after completing all of the builds I spent one full weekend bringing everything together for painting. I still have the final stowage to paint, but I love the look and I am very happy with it. 

 
I will be back soon with more! Thank you for checking this out.

Tuesday, November 9, 2010

Welcome back to the blog! Well, I spent a lot of time, and a lot of effort to get my lovely zeppelins done for the Mechanicon '10 in (West Chester, PA). I had spend a lot of late evenings, adding fiddly bits to the models and painting, painting, painting. So much so I made myself sick from lack of sleep and probably too much caffeine.

Well what for? Why go through all of this trouble? To make overly complicated models that a handful of people will ever see? I could say I make the models because no one else has. I could say I just want to see if I could make it. should I just say I do it for the gamer groupies? Actually I did it for the first two reasons. (There are no such thing as gamer groupies) I make the models to see if I can realise, what I think is a cool idea, into something you can touch and appreciate.

This army won first place in Best Appearance at Mechanicon 2010. The guys have a great convention and I am very grateful for it. It is THE old school tournament for warhammer 40,000. The gaming garage guys rock and really care about the event and the people who attend it. It really reminds me of the old Grant Tournaments Games Workshop used to put on. I make my stuff and care about my armies to share them with others at the one tournament I go to each year. (I make the time to go to this event!)

The responses I get from my fellow tournament goers was fantastic. Hearing people actually appreciate the work I put into the models is really why I did it. I love catching up with guys I have seen over the years, relaxing for the weekend and playing a few 40k games. The army even preformed well for me. I got a 3-1-1 record. Soon it will be time to get ready for the Cabin Fever event. (which the guys in Harrisburg run) I will be the guy to make it happen, so it will be my turn to host the festivities and see what you guys can do.

Soon I will post up close pictures of the zeppelins so you can see all of the detail for yourself. I just wanted to let you guys see something, since I hid the picts until after the event.

Thursday, October 28, 2010

Priming Day


Hi all and welcome back! So today I finally got my model kits of the zeppelin airships completed. I just finished my rivets on the engine mountings and took everything (sans airbags) out to begin priming them for painting tomorrow. I will be working on the cockpits first with the 2 crew for each one, then placing the aircraft glass in and gluing the ceilings on and beginning the exterior.
The overall aircraft will be based on the same color scheme as the rest of my vehicles. I am looking to do the old fashioned color schemes where, from the top down, the top of the zeppelin will have my standard camo scheme to blend in with the ground. and the lower sides of the zeppelins will be painted with a light, beige, white to blend in with the sky from the bottom up... thoughts? I had also considered just painting the gondolas like the camo scheme of my guys and the balloon to be painted like the sky... not sure at all...

Wednesday, October 27, 2010

Onwards to Mechanicon '10

Well, A few days ago, I posted about my getting back to the modeling of my zeppelins. Its been one week and I am almost all but done! All of the rivets are in place and just the engine mountings remain. I am used sooo many magnets that I am sure my poor hemoglobin will never be the same again. Today I had spent the better part building the additional weapon mountings I would need if I want to use my "zepps" as Valkyries or Vendettas. And since I am making three zeppelins at the same time means I needed to make not 3 twin linked Las Cannons, but 9 pairs! I had been planning for this for some time. I had been trading for IG Las Cannons for months as they came up.

Now that I have my las cannon mountings made, I have pretty much every weapon option I plan on using on my beloved zeppelins. (LC, Twin LC, MLRP, and HBs) I do not plan on using a nose mounted multi-laser (at least at the moment) since vehicles and transports are almost an automatic in most armies at this point. The LC gives me a better chance to get rid of 'em!

Now the last thing I need to do is make the landing gear for my zeppelins as well. I have modified the doors to open out in a reverse gull wing, I had installed steps on the inside of the doors for the troops to get out of the vehicle as well.
Since the doors open down in this fashion, I need the landing gear to be higher than normal to allow for a reasonable angle for the stairs inset into the doors. So I am modifying the gear to be taller. I will not be installing the gear on the zeppelins (they are inset into the vehicle) I will be building secondary bases for my zeppelins with the landing gear built into the base, and then I will put the zeppelin on the mountings to make it look like it landed and deployed the landing gear. This allows me to still have a base for my vehicle, and its exactly the same size... now to just finish the last item or to and to begin painting all of this in just 10 days =P.

- Bossman

Why the lack or posts?

Over the summer I would set aside my Xacto knife and bitz and get out into the fresh air and go hiking, camping and hit people with swords. I participate in Live Action Role Playing. The LARP I currently play is called Alliance. The chapter closest to me is the headquarters chapter in northern Pennsylvania. I am a staff member there and I am the head of their props department. I am responsible for making a lot of things. (see older posts for an idea).

Due to my ability to work with modeling supplies, and being an artist, allows me to occasionally pick up a little side project or two. The sword you are watching be built is one of those projects. The sword was requested to show a kind of Arabian style to it. The customer wished for it to be gem encrusted and to show the power of the lions of the desert. I began with a basic fiberglass core and created a "standard" closed-cell foam blade to look vaguely like a scimitar. But where the true test would be foind in this project was my ability to create a cross guard that contained the aspects of my patron.

The orange and purple material on the cross guard is called craft foam or fun foam. It comes in sheets and was cut with scissors and xacto knife to create flower motifs on the "back" of the cross guard and a stylized gem settings for the "front". The fun foam is then super glued to the corss guard so it sill stay in place for a very long time. The gems are found in any craft store as well. But what was to really set off the sword with the lions of the desert motif. I wanted lion heads on this, but where was I to get my inspiration? Well, in gaming figurines, of course! I found lion heads that I could modify and make into a lions head bas relief. I sculpted the rest of the lions head out with a non-drying clay and set to making a mold so I could resin cast them. The resin cast would allow for a stable material and I could inset heavy wire into the the resin mold to give it additional strength. (see? this is still relevant to modeling! =P)

After the mold was ready I line the inside of the mold with a gold powder and cast the lion in a dark grey resin allowing the powder to be inset into the piece and give me golden lions that could be semi-permanent and could accept a scratch or two without looking like crap. The tabs on the sides of the bas relief was to give an extra area to secure the lions head to the cross guard by wrapping tape over the tabs to pin it to the cross guard as well.

After I inset my two good casts needed for my lions, they were secured with superglue and gorilla tape. I then coat all but the lions heads and the inset gems with plasti-dip (tool dip) to coat the surface of the sword and to help waterproof it. This also added another layer of adhesive to the piece and acts as a primer base also!

This then allowed me to begin painting the cross guard and also making it look like gold. This was a simple process of using acrylic paint on the surface in a bronze, dark gold, then bright gold

The finished product is what you see here. This piece took a few days to make and I just jumped into the next project and so on and so one. I made suits of armor and more weapons than I care to count. Why no posts about this stuff at this point? basically. I just wanted to keep the blog to be about modeling figures, so I didn't post anything much at all until I could get back to my zeppelins and other goodies I am looking to make for my Vostroyan Imperial Guard. Well, thanks for reading and I am posting another status right after this to slake your thirst for my progress reports towards the Mechanicon '10

- Bossman

Tuesday, October 19, 2010

Back in the saddle again...

For those of you who followed my blog and then watched it drop off for the summer; fear not! I am back for another season of modeling converting and hobbying. I have completed my obligation to Alliance LARP one more season and I can get back to some of the things I have wanted to do, but haven't had the time.

First thing on my roster of stuff I want to do: Zeppelins. I promised that I was going to make 'em. I made good headway, and now I am back to it.

To the left are my progress shots. Over the last few days I had managed to get my work space cleaned out and back up to snuff. I began working on my Zeps on Friday night this past week. First step, Magnets... I magnetized damned near everything I could on these blasted vehicles. The gas bag is magnetized to the gondola. The cabin is magnetized to the gondola, the doors are magnetized. The sponsons are magnetized to the sides, the weapon mountings are magnetized to the cabin... and so on and so on and so on. Why so many magnets? I have them so I can break down the zeppelins and stow them away without any obnoxious protrusions to confound the "feng shui" of my figure case foams. I can add or remove weapon options as I see fit to make them as Valkyries or Vendettas. The magnets would not have been such a pain if I wasn't making 3 of them at the same time. Sadly I will be hard pressed to get them ready for Mechanicon '10, the first weekend in November.

After I got all of the magnets set into place I got my resin tail fins set into place on the scaffolding and put the rudders on as well. They were pinned and glued today to make the bags almost ready to be painted. (I still need to figure out the little extras on them like the observation howda, and the moorings to attach the bag physically to the gondolas to make them look a little more believable.

Not pictured here is the work I did today on the cabins. I am trying to get the glass panels ready to mount, so I can get the roofing made as well. (everything in order I suppose) So I did a lot of work on the exterior of the cabins and will get the gondolas up to the same appearance as well.

The inset rivets on the Valkyrie models are no good for the lower technology level of my Vostroyans. I will be adding extra banding to the exterior and lots of rivets as well. I believe I am going to take a note from Forge World and get a water filter to make the rivets this time...

In either case, this is a WIP of the "test fits" for the whole model put together at this point. well, 18 days to go. Wish me luck!

- Bossman